Branding a QR code without breaking it is a design problem with strict technical limits, and logo integration sits at the center of that challenge. A branded QR code is a scannable matrix that uses color, shape, frames, and often a central logo to match a company’s visual identity while still encoding data reliably. In practice, the logo is the highest-risk change because it occupies data modules near the middle of the symbol, where damage tolerance must absorb the interruption. I have tested hundreds of branded codes across packaging, menus, direct mail, retail displays, and event signage, and the pattern is consistent: the best-looking code is useless if a phone camera cannot decode it instantly.
Understanding logo integration in QR codes matters because the code is usually the last bridge between offline attention and online action. If it fails, campaigns lose scans, attribution, and trust. If it succeeds, it improves recognition and click-through behavior by making the symbol feel intentional rather than generic. Research from mobile marketing platforms and print response studies regularly shows that familiar branding can lift engagement, especially when users need a fast cue that a code belongs to a known business. The objective is not decoration. The objective is preserving first-scan success while increasing confidence, recall, and conversion.
To do that well, you need to know how a QR code works. Standard QR codes are built from modules, quiet zones, finder patterns, alignment patterns, timing patterns, format information, and encoded data. Error correction, defined in ISO/IEC 18004 and commonly offered at levels L, M, Q, and H, allows partial obstruction. Designers often assume that a higher error correction level means a logo can be any size. It cannot. Error correction protects against damage and masking within calculated limits, but real-world scanning conditions introduce glare, blur, distance, low contrast, lens distortion, and weak autofocus. Those variables reduce the safety margin quickly.
This article is the hub for logo integration in QR codes. It explains the technical boundaries, the design decisions that preserve functionality, the testing workflow professionals use, and the practical standards that make branded codes dependable across media. If you need one rule before all others, use this one: a logo should support recognition, not compete with machine readability.
What logo integration in QR codes actually means
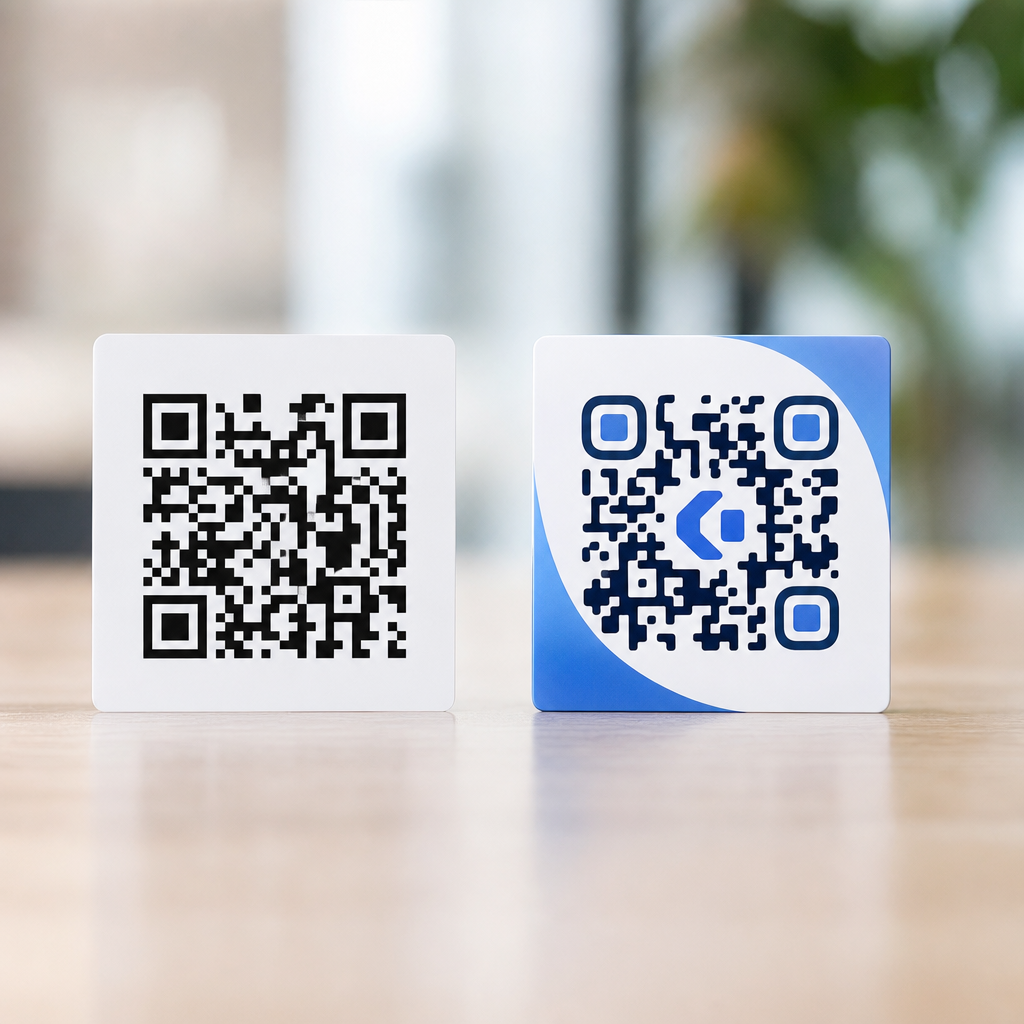
Logo integration in QR codes is the deliberate placement of a brand mark within or around the code while retaining fast, consistent decoding across devices. There are three common approaches. The first is a centered overlay logo placed on top of the data area. The second is a cutout logo, where modules are removed to create a reserved white area that holds the mark. The third is indirect branding, where the logo sits in a frame, callout, or landing page preview instead of inside the code itself. Of these, the centered overlay is the most popular and the most misused.
In production, centered overlays work because the middle of the code does not contain the finder patterns in the corners, which are essential for detection. However, the center still contains data modules and often alignment information in larger versions. Cover too much, and scan reliability drops sharply. When teams ask me for a safe answer, I usually recommend keeping the logo area near 10 to 15 percent of the total code area for general consumer use, then validating with device testing. Some high-density codes tolerate less. Some simple short-URL codes tolerate more. There is no universal percentage that replaces testing.
The content encoded in the symbol also affects logo flexibility. A short dynamic URL usually generates a less dense pattern than a long static URL containing tracking parameters. That difference is critical. Dynamic QR codes, managed through platforms such as Bitly, QR Code Generator, Beaconstac, or Flowcode, often allow shorter destination strings and editable redirects, which preserve cleaner module patterns. Cleaner patterns create more room for branding. Static codes lock all data into the symbol itself, and every extra character raises density and reduces the visual margin available for a logo.
File preparation matters too. Vector export in SVG, EPS, or PDF preserves sharp module edges for print, while raster output should be high resolution and scaled carefully. A blurry logo with transparent antialiasing can bleed into adjacent modules and harm contrast. The practical rule is simple: integrate the logo as a clean vector or a crisp high-resolution image, maintain a distinct boundary around it, and never let decorative effects soften the code’s module grid.
Technical limits that protect scan reliability
The biggest mistake in branded QR design is treating the symbol like a poster instead of a machine-readable pattern. Several parts must remain intact. The quiet zone, the blank margin around the code, should be at least four modules wide. Remove or crowd that space with background graphics and many scanners will fail before they even evaluate the data. The three finder patterns in the corners must remain untouched and high contrast. Timing patterns, the alternating modules connecting corners, should also stay clean because they help the decoder determine the grid.
Error correction is often described as the rescue system for logo integration, and that is broadly true. Level H can recover roughly 30 percent of codewords under ideal conditions, while Q is around 25 percent, M around 15 percent, and L around 7 percent. Those numbers are not permission to cover exactly that amount of visible area. Codeword recovery is not the same as arbitrary geometric obstruction, and scanners do not fail gracefully when contrast, perspective, and motion blur are involved. In field testing, a code with a 20 percent central logo may work on a bright iPhone at arm’s length and fail on a budget Android under fluorescent glare.
Color is another hidden constraint. Dark modules on a light background remain the standard because most camera decoders rely on luminance contrast more than hue contrast. A navy-on-white code usually scans well; a yellow-on-white code usually does not. Reversing the scheme to light modules on a dark background can work with some generators and scanners, but it is less robust and should be tested aggressively. Gradients, shadows, metallic inks, embossing, and patterned fills can all reduce the clean edge detection decoders need.
| Design factor | Recommended practice | Risk if ignored |
|---|---|---|
| Logo size | Keep near 10–15% of total area, then test | Central obstruction overwhelms error correction |
| Error correction | Use Q or H for logo versions | Minor print defects cause decode failure |
| Quiet zone | Maintain 4-module clear margin | Scanner cannot locate code boundary |
| Contrast | Dark code on light background | Camera struggles to separate modules |
| Encoded data | Use short dynamic URLs | Dense pattern leaves little room for branding |
| Output format | Prefer SVG or print-ready PDF | Blurred edges reduce recognition accuracy |
Size in the real world is equally important. For print, a practical starting point is a scanning distance ratio of about 10:1, meaning a code intended to scan from 20 inches away should be about 2 inches wide. That is not a law, but it is a reliable planning benchmark. Add a logo, and I usually increase the physical code size rather than trying to preserve the original footprint. More symbol area gives the camera more pixels per module, which offsets some of the decoding burden introduced by branding.
Best practices for adding a logo without harming functionality
The safest workflow starts before any visual styling. First, choose a short destination URL or a dynamic redirect. Second, generate the code at error correction level Q or H. Third, inspect the raw pattern density before adding the logo. If the code already looks visually crowded, simplify the encoded data rather than forcing the branding. This sequence prevents a common failure mode: using a long static URL, then compensating with oversized logos and aggressive stylization until the symbol becomes unreliable.
When placing the logo, reserve space deliberately. A white knockout behind the logo almost always performs better than placing a full-color mark directly over active modules. That clear buffer helps scanners preserve the surrounding geometry and makes the brand mark legible. Rounded corners on the knockout can work, but the reserved area should stay modest and centered. I avoid pushing logos toward corners or over timing lines because the visual gain is small and the scan risk rises quickly.
Logo choice also matters. Simple marks outperform complex lockups. A monogram, icon, or symbol with one or two colors is usually better than a full corporate signature with a tiny tagline. If a brand insists on including text, place that text outside the code in a frame or caption. The QR symbol should carry only the most recognizable visual identifier. In retail packaging, for example, a Nike swoosh or Starbucks siren is enough; adding legal copy inside the code only weakens performance.
Shape customization should be restrained. Dot-style modules and softened corners can work if contrast remains high and finder patterns stay conventional, but heavily stylized modules reduce decoder confidence. Most reliable branded codes use a hybrid approach: standard square finder patterns, subtle module rounding, a central logo, and a strong call-to-action outside the symbol. That balance keeps the code visibly branded while preserving the structural cues scanners expect.
Context helps more than designers sometimes realize. A frame that says “Scan to view menu,” “Verify product,” or “See setup guide” improves user response without increasing technical risk. It also reduces the temptation to overbrand the code itself. In restaurant deployments I have audited, the best scan rates often came from medium-sized black-on-white codes with a clean logo and a clear surrounding instruction, not from the most visually elaborate artwork. Clarity beats novelty almost every time.
Testing methods used by professionals
No branded QR code should go live without structured testing. My standard process includes device diversity, lighting variation, distance checks, angle checks, print checks, and data validation. At minimum, test on recent iPhone and Android devices, plus at least one lower-cost Android with an average camera. Native camera apps should be tested first because they represent common user behavior, followed by QR-specific apps if your audience is known to use them. A code that only scans in ideal conditions is not production-ready.
Print prototypes are essential because on-screen success can mask real-world problems. Matte paper, glossy packaging film, corrugated boxes, laminated menus, acrylic signs, and fabric labels all change contrast and glare. I have seen codes pass perfectly in a browser preview and fail after metallic spot varnish was added by the printer. Always test the final substrate, final size, and final finishing process. If the campaign spans multiple formats, test each one separately rather than assuming a passing result transfers across materials.
Track time to first scan, not just pass or fail. A code that decodes in half a second generally feels effortless; a code that takes three seconds may as well be broken in a busy environment. Measuring scan speed reveals issues that binary testing misses. It is also useful to test from realistic user positions: standing at a counter, sitting at a table, walking past a poster, or holding a product in one hand. These scenarios expose motion blur, awkward angles, and insufficient code size.
Use analytics to close the loop. Dynamic QR platforms can report scans by time, device, and location, helping you detect underperforming placements. If one print run has significantly lower engagement than another with the same destination, the problem may be the branded design, size, or placement rather than the offer. In one packaging project, replacing a gradient-filled code with a flat dark code and shrinking the central logo improved successful scans enough to lift redemption noticeably within two weeks.
Common branding mistakes and when to skip the logo
The most common mistake is assuming every QR code needs a logo inside it. Sometimes the better branding choice is no internal logo at all. If the code must be extremely small, will be scanned in poor light, or carries dense data for a complex workflow, internal branding may create more risk than value. In those cases, brand the surrounding label, landing page, or frame instead. The user still sees the source clearly, and the code keeps maximum functional tolerance.
Another mistake is ignoring placement environment. A code on a bus shelter, factory floor, or warehouse rack faces different scanning conditions than a code on a desktop brochure. Outdoor placements deal with sun glare, weathering, and distance. Industrial labels may collect dust or abrasion. Product packaging can bend around curved surfaces. These environments justify conservative design: larger symbols, stronger contrast, less stylization, and smaller logos. Good QR branding adapts to use conditions instead of applying one visual template everywhere.
Brands also run into trouble by exporting final artwork from general design tools without checking technical output. Transparency effects, clipping masks, and low-resolution raster logos can introduce artifacts. If the generator allows custom eyes, gradients, or embedded images, that does not mean every option is safe. Treat the generator as a starting point, not proof of performance. Final approval should depend on test scans, not on whether the preview looks modern.
When in doubt, simplify. A standard black-and-white QR code with a clean frame and direct call-to-action will outperform an overdesigned code in almost every difficult context. Branding should increase trust and recognition, but the code’s primary job is frictionless access. That is the lens professionals use when deciding how far logo integration should go.
Building a scalable brand system for QR codes
Teams that use QR codes regularly need standards, not one-off designs. Create a QR code brand guide that defines approved error correction levels, minimum size, quiet zone rules, color contrast thresholds, allowed logo treatments, file formats, and required testing steps. Include separate templates for packaging, signage, print ads, menus, product manuals, and digital displays. This reduces rework and prevents local teams or vendors from improvising risky variations that look on-brand but scan poorly.
A strong system also defines ownership. Marketing can own visual rules, but someone should own functional approval, usually a digital operations, web, or production lead. That role should verify redirects, analytics tagging, destination uptime, and test performance before release. In mature organizations, QR codes are treated as conversion assets, not decorations. The difference shows up in scan rates, support burden, and campaign attribution quality.
For companies building a content hub around logo integration in QR codes, the main benefit of a standardized approach is consistency at scale. The same design logic can support related guides on QR code size, color contrast, print testing, dynamic versus static codes, packaging placement, and campaign analytics. Each subtopic reinforces the same operational truth: the most effective branded QR code is the one that scans instantly in the real world.
Brand QR codes with discipline, and logo integration becomes an advantage instead of a liability. Keep the logo modest, protect the quiet zone and finder patterns, use high contrast, prefer short dynamic URLs, export clean files, and test on real devices in real environments. Those principles let you align a QR code with brand identity without sacrificing functionality.
The core takeaway is straightforward. A QR code is successful when users do not have to think about it. They notice the brand, understand the value of scanning, and reach the destination immediately. Everything in this guide supports that outcome, from error correction choices to print validation. If you are building a branded QR system, start with one template, document the rules, and test every variation before rollout.
Use this hub as the foundation for every article and workflow in your QR code design program, then apply the same standard to every logo-bearing code you publish. Better branding starts with better scanning.
Frequently Asked Questions
1. Can you add a logo to a QR code without breaking its scannability?
Yes, but only if the logo is treated as a controlled obstruction rather than a purely decorative overlay. A QR code is built from data modules, timing patterns, alignment patterns, finder patterns, and error-correction data. When you place a logo in the center, you are covering part of that structure, so the code must be designed to tolerate that loss. In most branded designs, the safest approach is to generate the code with a higher error-correction level, keep the logo centered, and limit its size so it does not overwhelm the symbol. The middle of the QR code is often used for logos because it avoids the three large corner finder patterns, which are essential for detection, but that does not mean the center is “free space.” It still contains encoded information that scanners need to reconstruct.
In practical terms, logo integration works best when the logo covers a modest percentage of the total code area, leaves a clear margin around itself, and does not interfere with key structural elements. It is also important to preserve strong contrast between the dark modules and the light background so that the scanner can still separate signal from decoration. Many failed branded QR codes are not caused by the presence of a logo alone, but by a combination of problems: oversized logo, low contrast colors, decorative module shapes that reduce clarity, and insufficient quiet zone around the code. If you want a branded QR code that remains dependable in real-world conditions, the logo should be the last design element added and then tested across multiple phones, camera qualities, screen brightness levels, print sizes, and distances.
2. What is the safest logo size for a branded QR code?
There is no single universal percentage that works for every QR code because capacity, version, print size, error-correction level, and scanning environment all affect tolerance. That said, the safest logo sizes are usually conservative. In general, a small to moderately sized central logo is far more reliable than a large badge-style mark that dominates the symbol. The more data your QR code contains, the denser the module grid becomes, and the less room you have to cover modules without causing scan failures. A short URL encoded in a dynamic QR code usually gives you more design flexibility than a long raw URL, vCard, or other high-capacity payload.
A good rule in practice is to start small, test aggressively, and only scale up if scanning remains fast and consistent. The logo should not touch the corner finder patterns, alignment patterns, or timing lines, and it should be surrounded by enough uncluttered space that the scanner can still interpret the grid around it. If the design includes a background shape behind the logo, remember that the shape counts as part of the obstruction too, not just the visible brand mark. Many people calculate logo size based only on the icon itself, but the true blocked area includes padding, white backing plates, shadows, and decorative borders. The safest branded QR codes are the ones where the logo looks intentional but not dominant, and where real-device testing confirms that function was preserved before the design is published or printed.
3. Which design changes are safe, and which ones most often reduce QR code functionality?
The safest customizations are the ones that preserve the QR code’s underlying geometry and contrast. Color changes can work well if dark modules remain genuinely dark and the background remains clearly light. Adding a frame with a call to action can also be effective if it does not intrude on the quiet zone, which is the blank margin around the code that scanners rely on for detection. Rounded modules, subtle shape styling, and branded color palettes can often be used successfully, but only when they do not blur module boundaries or make the code look too decorative for cameras to interpret quickly.
The most dangerous changes are usually the ones that alter structure rather than appearance. Covering too much of the center with a logo is one common problem, but other frequent issues include shrinking or stylizing the finder patterns too aggressively, removing the quiet zone, using gradients with low contrast, placing the code on a busy photographic background, and inverting colors in ways that confuse scanners. Extremely thin module rendering can also create trouble in print, especially on textured materials, glossy surfaces, or low-resolution output. Another high-risk choice is combining several “small risks” at once. A code might still work with a logo alone, or with rounded dots alone, or with a colored background alone, but when all of those changes are stacked together, the scan margin disappears. The best branded QR designs respect the technical hierarchy: keep the finder patterns obvious, maintain contrast, protect the quiet zone, use error correction intelligently, and treat every visual embellishment as something that must earn its place through testing.
4. How does error correction help when branding a QR code?
Error correction is the mechanism that allows a QR code to remain readable even when part of it is damaged, dirty, distorted, or intentionally covered by a design element such as a logo. QR codes use Reed-Solomon error correction, which adds redundancy so scanners can reconstruct missing or corrupted data. This is why branded QR codes are possible at all. By selecting a higher error-correction level, you increase the code’s ability to recover from interruption, which makes central logo placement more feasible. However, this is not a design shortcut that guarantees success. Higher error correction also increases the density of the symbol, meaning the module pattern may become tighter and potentially harder to scan if the code is printed small.
That tradeoff matters. A higher error-correction level can give you more resilience against logo obstruction, but it can also reduce readability if the final code becomes too complex for the intended size or medium. The right balance depends on what the code encodes and where it will be used. For example, a simple short URL displayed large on packaging may tolerate a branded center very well, while a dense code printed small on a label may fail even with high error correction. It is also important to understand that error correction is meant to compensate for limited, recoverable damage, not unlimited design freedom. It cannot rescue a code with poor contrast, missing quiet zone, distorted finder patterns, and an oversized logo all at once. The most reliable approach is to use error correction as a buffer, not as permission to over-design.
5. What is the best way to test a branded QR code before using it in print or marketing campaigns?
The best testing process is systematic, real-world, and stricter than many teams expect. Start by verifying basic scan functionality on multiple devices, including both iPhone and Android models, newer and older cameras, and native camera apps as well as common QR scanning apps. Test under bright light, indoor light, and dim conditions. Then test at different sizes and distances to match the actual use case. A QR code on product packaging may be scanned from arm’s length under mixed retail lighting, while a poster code may need to scan from farther away and at slight angles. A code that works on a desktop monitor at full brightness is not automatically safe for print.
You should also test the exact final artwork, not just the base code before design embellishments are applied. That means checking the version with the real logo, exact colors, final background, frame, and any print effects. If the code will appear on curved packaging, textured stock, glossy labels, embroidered materials, or low-resolution signage, test those production conditions too. It is smart to print prototypes at actual size and scan them after trimming, mounting, or applying finishes. Finally, test for speed, not just success. A branded QR code that only scans after several attempts is not truly production-ready. The ideal result is fast, repeatable scanning by ordinary users on ordinary devices, without careful positioning or multiple retries. If performance feels fragile in testing, simplify the design before launch. In QR branding, reliability is the real measure of quality.